Showing posts with label Plain flour ( maida ) recipes. Show all posts

Kodubale Recipe / Chegodilu with hyacinth beans / Karnataka Famous Food

0


Kodubale Recipe / Chegodilu with hyacinth beans / Karnataka Famous Food   


This is a snack recipe. When I first saw the recipe here, I was quite surprised and found it very interesting. I had some avarekai left in the fridge after preparing some Charu. So I thought of using it for the preparation of these chegodilu ( as we call them in Andhra ). They are crunchy, crispy snacks that fill our evenings. But today, I am preparing a softer version which are not so crispy. But they have an excellent texture which are chewy and very tasty. I have adapted the recipe to suit my family´s tastes. Do try out and let me know how it turned out for you. 

kodubale recipe with hyacinth beans

These field bean snacks are very easy to prepare and very tasty as well. However, they are not very healthy in the sense that they absorb too much oil when deep fried. So, I do not recommend these snacks on a daily basis, but are perfectly ok 👌 for festive occasions. Since Ugadi 2018 is another 20 days ahead of us, I planned to prepare this dish for the same.

chegodilu with hyacinth beans

The outcome of this snack is supposed to be crunchy and crispy but I made a soft version which was delicious as well. Serve this hot and your family 👪 would enjoy it thoroughly. However, you can also serve it cold, there is no compromise on taste.

karnataka special foods

You can also try out my other snacks like

Poha Oats Chivda 

Jowar Flour Murukku

Sago Vada

Soya Bean Sundal

Black Chickpeas Sundal

Aloo Matar Chat

Homemade Tapioca Chips

Masala Sweet Corn


Preparation


Cook the field bean seeds into soft in a pressure cooker until soft for upto 3-4 whistles. 


When they cool down, drain the water and mash them with a masher or hands.


You can also put them in a blender to get a smooth consistency. Do not throw away the water. We will require it to make a dough. Add salt, chilli powder, curry leaves, ajwain and hing. Mix everything well.


Now add the rice flour and maida flour and combine everything with your hands.


Heat homemade ghee until smoking point and add to rice flour mixture.


Carefully mix thoroughly with your fingers such that the ghee is nicely coated with the flour mixture. Now add the water ( that was kept aside earlier ) little by little to make a soft dough. It should neither be too watery nor too dry.


The consistency of the dough should be such that we should be able to form rings from the dough without breaking. If the dough Is too watery, then it will not hold the shape. Similarly if the dough is too dry, the dough will break when we try to form rings. Once the dough is ready, prepare the rings as shown in the video.


Sprinkle few sesame seeds on the platform. Take a small lemon sized ball from the dough and roll gently on the sesame seeds. Pressing gently, roll and form an even shaped cylinder. Join the edges and press gently such that they do not get apart. Prepare the rings until the dough is finished.


Heat oil in a pan for deep frying. The oil should not be too hot. If you drop a small piece of dough, it should come up immediately. At this point, drop the prepared rings in batches of 5 - 6.


Immediately, reduce the flame and cook on a low flame until they are cooked. They become light brown in colour and the bubbles also reduce. Remove from oil with the help of a slotted ladle and place on a tissue paper to absorb the excess oil. Repeat the frying process until completely done. Serve hot or at room temperature.

festival recipes

Ingredients


Avarekai. 1 cup

Rice flour  2 cups

Maida  1/4 cup

Salt. To taste

Chilli powder. 1 tsp

Curry leaves  2 -3 sprigs

Hing  a big pinch

Ajwain 1/2 tsp

Ghee 2 tbsp.

Sesame Seeds  2 tbsp.

Oil for deep frying

Method


  1. Cook avarekai in a pressure cooker until soft for 4-5 whistles.
  2. Drain the water and mash the avarekai very well. 
  3. Add rice flour, maida, salt, chilli powder, curry leaves, ajwain and hing. 
  4. Mix everything well and add hot ghee. 
  5. Carefully mix with your hands such that the ghee incorporates in the flour completely. 
  6. Now add water little by little and make a smooth dough just enough to make rings out of it. 
  7. Make rings with the dough as shown in the video. 
  8. Heat oil in pan for deep frying. 
  9. Fry these rings in a low to medium heat until they become golden brown in colour or until the bubbles stop. 
  10. Put them on a tissue paper to absorb the excess oil. 
  11. When they cool down, store them in an airtight container. They stay fresh for until 2-3 days.

Notes


  • These chegodilu are soft on the inner side and are chewy. An awesome evening snack. 
  • These can also be made crispy and crunchy by another method. I will share the same in another post. 
  • You can also use white sesame seeds instead of black sesame seeds.  
  • You can also add finely chopped coriander leaves, cumin seeds or ginger garlic paste as per your taste and preference.
  • You can also add butter or oil in place of ghee


Continue ...

healthy banana oatmeal muffins with yogurt / quick and easy oatmeal muffins / banana oatmeal yogurt muffins

0


Healthy banana oatmeal muffins with yogurt / quick and easy oatmeal muffins / banana oatmeal yogurt muffins


Banana 🍌 and oats - very good and healthy combination of food. There are so many dishes that can be prepared with this combo. Today I am sharing a simple muffin recipe with this combo of bananas and oatmeal.
 
healthy banana oatmeal muffins with greek yogurt

I had some over ripe bananas which my kids never dared to touch. So I had to use them in some preparation. I have already posted some recipes with over ripe banana like banana Choco bread 🍞, banana appalu. I wanted to prepare a banana walnut loaf bread with these over ripe bananas, but changed my mind and went ahead with these healthy banana muffins with yogurt.

quick and easy oatmeal muffins

These moist banana oatmeal muffins were so tasty 😋 that my man 👨 and kids loved them a lot. I also packed these tiny banana cupcakes for their snack break as well. These were loved by their friends as well. There is a secret ingredient added to this muffin recipe which might have contributed to that amazing taste.
 
banana oatmeal yogurt muffins

The secret ingredient is sugarcane juice. Yes, you heard it right. I have added sugarcane juice to these muffins. But, if you do not have it handy, then you can substitute it with maple
🍁 syrup. You can check my recipe to extract juice from the sugarcane at home. The other main ingredient that goes into the preparation of this egg free banana muffins is Greek yogurt. So these muffins are so healthy considering the fact that Greek yoghurt, bananas, sugarcane juice and oats are very good for health.
These breakfast banana muffins are soft, moist and delicious
😋. They can be had as such for breakfast, brunch or as an evening snack. Kids or elders who are hesitant to eat oats will love this muffin as they cannot even hint that they are made with oats.

breakfast banana muffins

You can also check my other bakes which are very healthy and nutritious


Preparation

Powder sugar and jaggery separately one after the other and keep aside. Similarly, make a fine powder of oats and sieve it through a fine strainer. Set aside. Mash the banana well with your hands or use the blender to make a smooth pulp without any pieces or lumps in it. Keep aside. Now take all the dry ingredients namely oat flour, maida, flax seed powder, salt, cinnamon powder, baking powder and baking soda in a bowl.


Take yoghurt in another bowl and add the banana puree.


Mix well and add olive oil.


Give a nice mix and add the sugarcane juice and vanilla essence. Mix well until combined.


Now add the powdered jaggery and sugar and whisk well until it is all mixed up completely.


Now add the dry ingredients mixture little by little. Mix well until incorporated. Do not over mix.


Pour into greased muffin tray or cups. Garnish with sliced pistachios or raisins or any other nuts of your choice. Bake at 180 degrees Centigrade for 30 - 40 minutes  or until a tooth pick inserted in the centre of the muffin comes out clean. Allow it to cool completely before removing them from the tray or cups.

eggless banana oatmeal cupcakes


Ingredients

Jaggery powder 1/2 cup
Sugar  1/4 cup ( powder it )


Dry Ingredients

Oat flour 1 3/4 cup
Maida 1/2 cup
Baking powder  1 tsp
Baking soda  1/2 tsp
Salt  big pinch
Cinnamon powder  3/4 tsp
Flax seed powder  1 tbsp.


Wet Ingredients

Mashed bananas 1 1/2 cups ( about 3 bananas )
Sugarcane juice  1/4 cup
Olive oil  3/4 cup
Vanilla essence  1 tsp
Greek yoghurt 1/2 cup


Method
  1. Powder the sugar and jaggery separately and keep aside. Powder the oats into fine flour and sieve. Keep aside.
  2. Mix all the dry ingredients in a bowl and set aside.
  3. Take the wet ingredients namely yoghurt, mashed bananas, vanilla essence, olive oil, sugar cane juice one after the other and mix nicely until everything is combined.
  4. Add jaggery powder and sugar powder and mix again.
  5. Now add the dry ingredients slowly little by little stirring well after each addition.
  6. Pour into greased muffin moulds or cups and top with nuts, raisins, dates or cherries 🍒.
  7. Bake at 180 degrees Centigrade for 30 - 40 minutes or until done.
  8. Cool completely before removing from the muffin tray.

Notes


  • Do not overmix the batter after adding the dry ingredients.
  • The original recipe calls for maple 🍁 syrup in place of sugar cane juice. 
  • You can top the muffins with any nuts or dates of your desire or a combo of any of these. 
  • You could also use whole wheat flour instead of oat flour.
  • Make sure that you puree the bananas well without any pieces in it. You can grind it in a mixie to get it right.
  • You can substitute cinnamon powder with cardamom powder if you like the flavour of the latter. 


Continue ...

Easy vanilla cake recipe from scratch / Vanilla sponge cake /

0

Tasty Sponge Cake Recipe / Homemade Vanilla Cake / Easy Vanilla Cake Recipe from Scratch / Butter Sponge Cake 


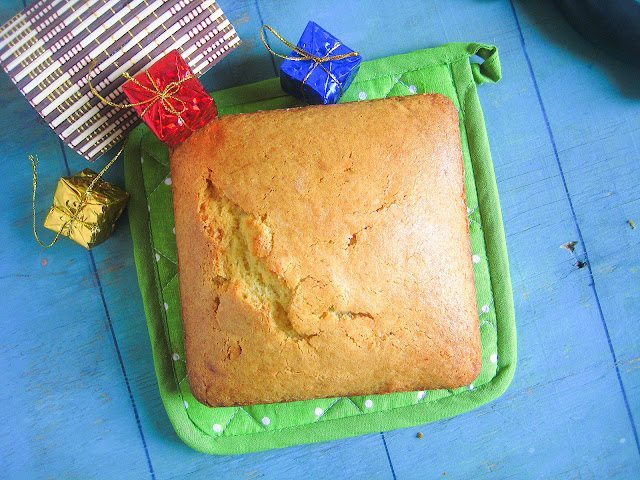
Tasty sponge cake recipe

I have posted many cakes in my blog all of which are very healthy. All of them were a huge hit especially with my kids. This is my first sinful cake prepared with plain flour ( Maida Or all-purpose flour ) and full of butter. I felt so guilty while preparing this tasty sponge cake but it has been made for the special occasion of Christmas. I wish all my readers a very merry X-Mas and a very happy new year.

Homemade vanilla cake

This egg sponge cake is a quick and easy vanilla cake. This cake can be prepared in a jiffy without much ingredients. This easy homemade cake is made with butter, icing sugar, eggs and plain flour. I have used icing sugar instead of normal sugar giving it an extra punch. The homemade butter that I used in this preparation gave it a delicious taste which my kids loved a lot. They had 2 big pieces in a shot leaving very small pieces for me and my in laws.

easy vanilla cake recipe from scratch

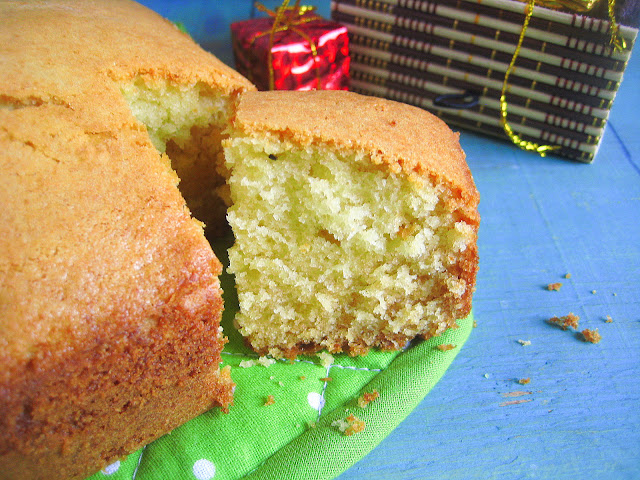
The texture of this homemade vanilla cake was so soft and spongy. There is no requirement for any icing for this cake. It can be had as such unless you are preparing it for birthdays. This is just like any other store bought cake prepared with homemade ingredients. This is the easiest vanilla cake recipe that has been made from scratch. The icing sugar was also homemade. I have prepared icing sugar all by myself in my mixer jar. I will be posting that recipe so soon, but just for my readers, I am giving out the details. Take 100g of sugar and 15g of corn flour. Grind in a mixer and your icing sugar is ready to be used for frosting or for cakes. You can also use store bought icing sugar.

butter sponge cake

You can also view my other healthy cake recipes :

Healthy Vegan Chocolate Cake


Preparation


Sieve flour, baking powder and baking soda and keep aside. Take butter at room temperature. Whisk using a normal whisk or an electric hand blender. I have taken the help of the latter. Sometimes the butter tends to curdle. But do not panic. It is all ok and proceed with the remaining process of preparing the cake.


Add the icing sugar and beat again.


Whisk until it becomes creamy. Add the eggs and beat once again until it gets well mixed.


It took almost 15 minutes for me to beat using the hand blender. Add vanilla essence and gently mix in the batter.


Now gradually add the flour and mix with a ladle in one direction until the flour is mixed well with the butter batter.


Mix until all the flour is used up. The resulting batter will be thick. Pour into a greased tin and tap well so that the air bubbles if any will be released and will fluff up evenly. You can garnish the cake with any dry fruits of your choice.


Bake at 180 degrees Centigrade for 30 minutes or until a knife or toothpick inserted in the centre of the cake comes out clean. After baking, switch off the oven and leave the cake in the oven for 15-20 minutes. After removing the cake out of the oven, allow it to cool completely before  taking it out of the cake pan. Once completely cool, invert the cake pan and gently tap on the base. Cut into pieces and serve with or without frosting.

vanilla sponge cake


Ingredients


Maida  1 cup

Butter  1 cup

Icing Sugar  1 cup

Vanilla essence  1/2 tsp.

Eggs 2

Baking powder 1/2 tsp.

Baking soda 1 /2 tsp.

Ghee to grease the cake pan


Method

  1. Sieve flour, baking powder and baking soda and keep aside. 
  2. Take butter at room temperature and beast well with a whisk. 
  3. Add icing sugar and whisk with an electric hand blender or with a whisk manually until the batter becomes creamy. 
  4. Add vanilla essence and mix once. 
  5. Now add flour gradually and mix in a single direction with a ladle until all the flour is used up.
  6. Pour in a greased cake pan and tap well on the platform. 
  7. Bake at 180 degrees Centigrade for 20 - 30 minutes or until a knife inserted in the centre of the cake comes out clean. 

Notes

  • Always grease the cake pan with ghee and dust with flour. Dusting with flour helps in removing the cake easily after baking. You can also use the butter paper. 
  • Bake a cake at 180 degrees Centigrade and keep an eye after 20 minutes. Any cake tends to bake fast depending on the size of the cake pan and the position where you place the cake in the oven ( middle, lower or higher ). 
  • If you feel that the cake is burning on the top but is not done in the centre, then cover the cake with an aluminium foil.
  • You can decorate the cake with any dry fruits ( cashews, dates, cherries, etc., ).

I once again wish all my readers a merry X-Mas and a very happy new year. 


Continue ...