Showing posts with label South Indian Food. Show all posts

Kodubale Recipe / Chegodilu with hyacinth beans / Karnataka Famous Food

0


Kodubale Recipe / Chegodilu with hyacinth beans / Karnataka Famous Food   


This is a snack recipe. When I first saw the recipe here, I was quite surprised and found it very interesting. I had some avarekai left in the fridge after preparing some Charu. So I thought of using it for the preparation of these chegodilu ( as we call them in Andhra ). They are crunchy, crispy snacks that fill our evenings. But today, I am preparing a softer version which are not so crispy. But they have an excellent texture which are chewy and very tasty. I have adapted the recipe to suit my family´s tastes. Do try out and let me know how it turned out for you. 

kodubale recipe with hyacinth beans

These field bean snacks are very easy to prepare and very tasty as well. However, they are not very healthy in the sense that they absorb too much oil when deep fried. So, I do not recommend these snacks on a daily basis, but are perfectly ok 👌 for festive occasions. Since Ugadi 2018 is another 20 days ahead of us, I planned to prepare this dish for the same.

chegodilu with hyacinth beans

The outcome of this snack is supposed to be crunchy and crispy but I made a soft version which was delicious as well. Serve this hot and your family 👪 would enjoy it thoroughly. However, you can also serve it cold, there is no compromise on taste.

karnataka special foods

You can also try out my other snacks like

Poha Oats Chivda 

Jowar Flour Murukku

Sago Vada

Soya Bean Sundal

Black Chickpeas Sundal

Aloo Matar Chat

Homemade Tapioca Chips

Masala Sweet Corn


Preparation


Cook the field bean seeds into soft in a pressure cooker until soft for upto 3-4 whistles. 


When they cool down, drain the water and mash them with a masher or hands.


You can also put them in a blender to get a smooth consistency. Do not throw away the water. We will require it to make a dough. Add salt, chilli powder, curry leaves, ajwain and hing. Mix everything well.


Now add the rice flour and maida flour and combine everything with your hands.


Heat homemade ghee until smoking point and add to rice flour mixture.


Carefully mix thoroughly with your fingers such that the ghee is nicely coated with the flour mixture. Now add the water ( that was kept aside earlier ) little by little to make a soft dough. It should neither be too watery nor too dry.


The consistency of the dough should be such that we should be able to form rings from the dough without breaking. If the dough Is too watery, then it will not hold the shape. Similarly if the dough is too dry, the dough will break when we try to form rings. Once the dough is ready, prepare the rings as shown in the video.


Sprinkle few sesame seeds on the platform. Take a small lemon sized ball from the dough and roll gently on the sesame seeds. Pressing gently, roll and form an even shaped cylinder. Join the edges and press gently such that they do not get apart. Prepare the rings until the dough is finished.


Heat oil in a pan for deep frying. The oil should not be too hot. If you drop a small piece of dough, it should come up immediately. At this point, drop the prepared rings in batches of 5 - 6.


Immediately, reduce the flame and cook on a low flame until they are cooked. They become light brown in colour and the bubbles also reduce. Remove from oil with the help of a slotted ladle and place on a tissue paper to absorb the excess oil. Repeat the frying process until completely done. Serve hot or at room temperature.

festival recipes

Ingredients


Avarekai. 1 cup

Rice flour  2 cups

Maida  1/4 cup

Salt. To taste

Chilli powder. 1 tsp

Curry leaves  2 -3 sprigs

Hing  a big pinch

Ajwain 1/2 tsp

Ghee 2 tbsp.

Sesame Seeds  2 tbsp.

Oil for deep frying

Method


  1. Cook avarekai in a pressure cooker until soft for 4-5 whistles.
  2. Drain the water and mash the avarekai very well. 
  3. Add rice flour, maida, salt, chilli powder, curry leaves, ajwain and hing. 
  4. Mix everything well and add hot ghee. 
  5. Carefully mix with your hands such that the ghee incorporates in the flour completely. 
  6. Now add water little by little and make a smooth dough just enough to make rings out of it. 
  7. Make rings with the dough as shown in the video. 
  8. Heat oil in pan for deep frying. 
  9. Fry these rings in a low to medium heat until they become golden brown in colour or until the bubbles stop. 
  10. Put them on a tissue paper to absorb the excess oil. 
  11. When they cool down, store them in an airtight container. They stay fresh for until 2-3 days.

Notes


  • These chegodilu are soft on the inner side and are chewy. An awesome evening snack. 
  • These can also be made crispy and crunchy by another method. I will share the same in another post. 
  • You can also use white sesame seeds instead of black sesame seeds.  
  • You can also add finely chopped coriander leaves, cumin seeds or ginger garlic paste as per your taste and preference.
  • You can also add butter or oil in place of ghee


Continue ...
Easy Chayote Squash Side Dish Recipes / Chow Chow Vegetable Side Dish For Chapathi / Easy Chayote Recipes / Bangalore Vankaya Gravy Curry for Chapathi or Rice

0

Easy Chayote Squash Side Dish Recipes / Chow Chow Vegetable Side Dish For Chapathi / Easy Chayote Recipes / Bangalore Vankaya Gravy Curry for Chapathi or Rice 


Today's recipe is a side dish for chapati prepared with chow chow vegetable. This is no regular curry. It has got a rich, creamy texture with just the normal ingredients. The addition of lentils like the channa dal and moong dal gives the dish a delicious and homely taste. Actually you can prepare two versions for the same curry that goes with rice 🍚 as well. I have already posted the simple chayote kootu. Though the kootu also included channa dal but the taste of this easy chayote squash side dish gravy was completely different and tasted better than that of kootu

bangalore vankaya gravy curry

To make the dish rich and creamy like that of the restaurant style, I have added some milk. The curry was so delicious 😋 that my man 👨 loved it a lot and had way extra curry with chapattis. To accompany this dish with rice, just avoid adding milk to the gravy. You will be left with a simple yet amazing side for rice which can either be mixed or as a side. The preparation of this Bangalore Vankaya ( Bangalore Kathirikai ) is very easy. Just mix all the ingredients in the cooker and cook. As simple as said. 

bangalore kathirikai recipes


Preparation


Peel the skin of Bangalore Vankaya ( Bangalore Kathirikayi ). Discard the inner seed. Chop into small pieces and keep aside. Wash the lentils and keep aside. Get the remaining ingredients ready. Heat oil in a pan and do the tempering with mustard and cumin seeds.


When they splutter, add chopped onion ,slit green chillies and ginger garlic paste.
  

Fry until the onions turn transparent. Throw in the chopped tomatoes along with salt and turmeric powder.


Cook until the tomatoes become soft. Now add the masalas like coriander powder, chilli powder and garam masala powder.


Give a nice mix and add the washed lentils.


Stir in completely and add the chopped chayote pieces and mix well.


I had some leftover purple cabbage fry which I included in the curry. This is completely optional, but if you have any other leftover fry, you can go ahead and add it in your preparation. I do this kind of preparation on a daily basis which adds an extra flavour to the dish. You can add fresh cabbage leaves as well.


Now add sufficient water and cover with the lid.


Cook for 2-3 whistles and switch off the flame. Remove the lid when the pressure subsides. If you are serving this curry with rice, then serve hot after checking the seasoning.


If you are planning to serve this dish with roti, then go ahead and add milk in the gravy.


MIx it well and add little tomato ketchup.


Give a nice stir and check for seasoning. Add chilli powder if you want it more spicy. For me, it was perfect. Let it cook on a low flame until it comes to a boil. Garnish with coriander leaves and serve hot with chapathi. Chow chow vegetable side dish  with restaurant style gravy for chapathi is ready. 

chayote squash indian recipes

Ingredients


Chayote vegetable 2 big
Channa dal  3 tbsp.
Moong dal  3 tbsp.
Onion  1 big
Tomatoes  2
Ginger garlic paste  1 tsp
Green chillies  2
Turmeric powder  1 tsp
Salt to taste
Oil  2 tbsp.
Coriander powder   tbsp.
Chilli powder  1/2 tsp
Leftover cabbage fry  1 cup ( optional )
Milk 1/2 cup
Tomato ketchup 2 tsp
Mustard seeds 1/2 tsp
Cumin seeds 1 tsp

Method


  1. Heat oil in a pressure cooker. 
  2. Temper it with mustard and cumin seeds. 
  3. Once they crackle, add onions and slit green chillies.
  4. When they turn transparent, add ginger garlic paste. 
  5. Add tomatoes, salt and turmeric powder and cook until the tomatoes become soft. 
  6. Sprinkle coriander powder, chilli powder and garam masala powder. 
  7. Mix well and add the washed lentils ( dals ). 
  8. Add the chopped chow chow and the leftover cabbage ( optional ). 
  9. Add water, mix well and cover with lid. 
  10. Cook for 2-3 whistles and switch off the flame. 
  11. Garnish with coriander leaves and serve hot with rice. 
  12. If serving with roti or chapathi, then add milk and tomato ketchup to the cooked gravy and let it come to a boil. 
  13. Remove from flame and garnish with coriander leaves. Serve hot with roti. 

Notes


  • You can add any leftover fry curries for this gravy curries. This is purely optional. You can skip this step if you do not have any leftovers. I generally tend to use my leftover foods in this way. Adopting this method, gives a new dish each and every time and prevents food getting wasted. Your family will also get the feeling that they are eating fresh and not leftovers. 
  • Addition of lentils gives a very homely touch to the dish. , So do not skip the lentils. 
  • You can also include other lentils like whole moong or sprouts as well. 


Continue ...

Juicing Sugarcane / Sugarcane Juice Recipe / Sugarcane Recipes

0

Juicing Sugarcane / Sugarcane Juice Recipe / Sugarcane Recipes 


Today's recipe is made with another seasonal ingredient - sugar cane. The markets and shops are full of sugarcane sticks during pongal and the following month. This year my mom in law made the famous sweet  pongal dish with this sugarcane. It tasted awesome. I did plan to post the same but as told earlier, I was very busy to capture and update. But I sure would do the same in the coming posts one day.

sugarcane recipes

But for today, it's the sugarcane juice. Everybody I feel loves this sugarcane juice. My kids love this juice and they also love chewing the pieces as well. I make it a point to see that they eat the seasonal foods which are said to be loaded with nutrition and health thereby increasing the immunity in them.
This sugarcane juice is so very easy to prepare with no additional ingredients at all. Just peel the skin, chop into small pieces and put them in blender to extract the juice. So lets start off. 


sugarcane juice ingredients


Preparation

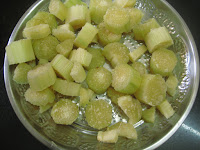
Peel the skin of the sugarcane sticks with the help of a knife 🔪.


Then chop into small pieces removing the pieces that are hard in between.


Put these pieces in a blender ( mixie ) with little water. Add little water just enough to run the mixie jar. If you add too much water, then the juice will get diluted and will lose its sweetness.


Mixie well and strain the juice using a filter. Squeeze the pulp with your hands in the filter.


Repeat the process until you are done with all the pieces.


Add lemon juice if desired with some ice cubes and enjoy this drink with your family and friends. 

juicing sugarcane at home


Ingredients

Sugarcane 1/2 a stick


Method

  1. Peel the skin of the sugarcane with knife.
  2. Chop into small pieces.
  3. Put in a mixie jar and mixie with little water.
  4. Filter the juice and squeeze the pulp with your hands.
  5. Add lemon juice and ice cubes according to your liking and serve.

Notes

  • Do not add too much water while grinding in the mixie. Just add enough water to run the mixie.
  • I served plain juice as my kids prefer it that way.


Continue ...

how to cook cauliflower indian style / gobi kurma curry / cauliflower recipes for rice or roti /

0

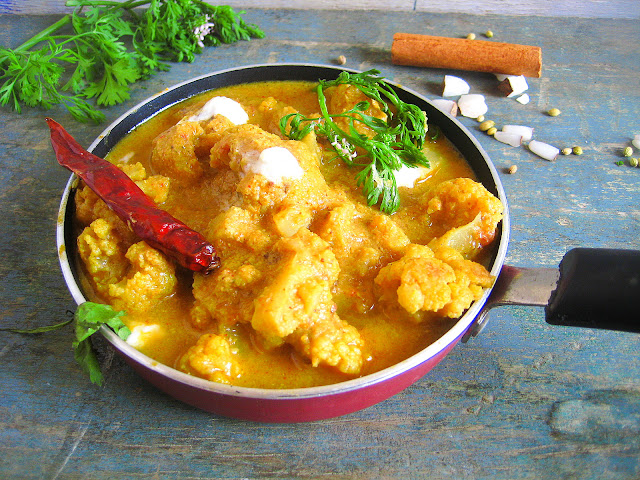
 Cauliflower Gravy Curry / Cauliflower Kurma Curry / Gobi Curry for rice or roti 


easy cauliflower recipes indian
 
This is the season for fresh and cheap veggies. All the veggies are so fresh and they are available in such cheap prices that whenever I visit the Santhe here, I tend to buy all veggies which are way too much for a family of four. I get really tempted to buy fresh and seasonal veggies which are available only in some seasons. Cauliflower is one such veggie which is available in different sizes especially during the winter season. On one such Sunday, I found the local market filled with cauliflowers ( so fresh ) that I couldn´t resist myself from purchasing four cauliflowers.

gobi kurma curry

My family loves cauliflower in any way - cauliflower green peas fry, gravy, kurma etc,. I also add small pieces of cauliflower in upmas as well. They simply love the addition of cauliflower in basically anything. Since I had many cauliflowers at hand, I thought of preparing cauliflower kurma recipe. This is an Indian style of cooking cauliflower which is very easy to make with simple ingredients.

gobi recipes for roti

This cauliflower gravy or gobi curry is a perfect side dish for many varieties - chapathi, roti, naan, dosa, rice, pulav or any other mildly flavoured rice variety. This kurma curry was so much loved by my kids. This is indeed a spicy curry, but I have reduced the spice to suit my kids taste buds. All the spice lovers out there can increase the spice according to your liking.  

gobi curry

The secret to such an immense flavour and aroma to this cauliflower curry lies in the list of the ingredients that go into the preparation of the masala ( gravy ). Each ingredient blends so well with the others making it an ultimate combo that suits very well with the cooked and roasted cauliflower florets. Needless to mention, this is yet another healthy food recipe that has been added to this blog . I hope each one of you will prepare this spicy and flavourful curry and enjoy with your family.

You can also view my Mixed Vegetable Curry which tastes amazing with chapathi or naan.

Preparation


Separate the cauliflower into small florets and wash carefully. Make sure that you remove all the insects if any. Cook these florets in water until they change their colour slightly and become a little softer.


While the florets are getting cooked, we will prepare the masala. Grind onion, garlic, ginger, cashew, poppy seeds, cloves, dalchin, coconut pieces and cardamom in a mixie to a smooth paste. Keep aside.


Now if the florets are done, switch off the flame and drain the water.


Do not throw away the water. We are going to use this water for the preparation of this gobi kurma. Keep the cooked pieces in a colander. Take a pan and heat 1 tbsp. of oil in it. Add the cooked cauliflower florets and let them get roasted for a while. Keep stirring occasionally.


Once they are roasted, transfer to another plate and set aside. In the same pan, add remaining oil and add cumin seeds.


When they splutter, add turmeric powder and add the ground masala.


Add salt and mix well and allow it cook on a low flame until the masala releases the oil on the sides. While this is getting cooked, prepare the tomato puree and keep aside.


Once the masala releases oil on the sides, add the tomato puree and mix well.


Add coriander powder and chilli powder and cook covered on a low flame ....


....until you see oil floating on the top of the gravy.


Now add water and add the roasted cauliflower florets and mix.


Add milk and cook for some more time.


Check for salt and spice and switch off the flame.


Serve hot after garnishing with cream and coriander leaves. 

how to make cauliflower kurma curry


Ingredients


Cauliflower 2 ( small ) Or 6 cups of florets

Chilli powder 1 tsp

Salt to taste

Coriander leaves to garnish

Oil 3 tbsp

Tomatoes 2  ( small )

Cumin seeds 1 tsp

Turmeric 1 tsp

Coriander powder 1 1/2 tsp

Milk 1/2 cup

To Grind


Onion 2 ( diced )

Cashew 1/4 cup

Garlic 6

Ginger 1"piece

Poppy seeds 3 tsp

Cloves 4

Dalchin 1"piece

Coconut 3 tbsp ( finely chopped )

Cardamom 2

Method


  1. Wash the florets, blanch and keep aside.
  2. Heat 1 tbsp. of oil in a pan and fry the florets. Transfer to a plate and keep aside.
  3. Grind all the ingredients that are mentioned under ´´ To Grind ´´ and prepare the masala.
  4. Heat remaining oil in a pan and add cumin seeds and turmeric powder.
  5. When the cumin seeds crackle, add the ground masala and salt and mix well.
  6. Cook on a low flame until the oil releases from the sides. 
  7. Now add the tomato puree, chilli powder and coriander powder and mix well. Cook covered on a low flame until the oil starts floating on top of the gravy. 
  8. Now add some water, fried cauliflower florets and milk. Mix well. 
  9. Check for salt and spice and cook for a few more minutes. 
  10. Garnish with coriander leaves and cream and serve hot with rice, roti, chapathi, dosa or any other flavored rice.

Notes


  • You can increase or decrease the amount of spice as per your desire. 
  • Adding milk is optional but it gives a richness to the curry. 
  • Other veggies like green peas, beans, potatoes can also be added to this kurma curry.
Continue ...