Showing posts with label Vegetarian Recipes. Show all posts

Simple Drumstick Curry Recipe / Drumstick Vegetable Recipes / Vegan Drumsticks / Muringa curry

0

Munagakaya Curry / Simple Drumstick Curry Recipe / Drumstick Vegetable Recipes / Vegan Drumsticks / Muringa curry 


The local market here is bursting with fresh veggies like drumstick ( Muringa ), tender spring onions, green peas, tomatoes , shallots and green leafy veggies like methi etc. Needless to mention the variety of fruits - oranges, grapes, Gulab guavas, watermelons, musk melons are a few. I actually went to the market to buy some tamarind. But seeing the fresh veggies I could not resist myself and bought many of them. I felt as if the veggies were waiting for me to take then along with me. So I grabbed as many as I could. But my son who accompanied me was becoming impatient. Vegetable shopping is one thing that I simply love , especially if its a farmers market.

munagakaya tomato kura

Today I am posting a basic and simple drumstick curry with tomatoes and onions as the base. This is such a side dish that make you leave licking your fingers. The tangy and juicy tomatoes along with the onions give an excellent gravy for the tender drumsticks. This combo of tomatoes, onions and drumstick is a must try in every household at least once during this season. So lets see the preparation of munagakaya curry ( muringa curry ). 
 
simple drumstick curry recipe

You can also check my recipe of drumstick leaves chutney powder aka murungai keerai podi alias munagaku karam podi.

Preparation


Wash and cut the drumstick into finger size pieces. Put them in a tumbler and add water just enough to cover them.


Cook them on a medium flame until the drumstick become soft and tender.


In the meantime, chop the onions and tomatoes finely. Drain the water from the drumstick and keep aside. Do not throw the water, we will want to use it for the preparation of the curry. Heat a pan and add oil in it. Temper it with mustard and cumin seeds.


When they splutter, add curry leaves, red chillies and hing.


After a few seconds, add finely chopped onions and slit green chillies. 


Mix well and cook until they are translucent. Add ginger garlic paste and cook until the raw smell of ginger vanishes.


Add the finely cooked tomatoes, salt, sugar and turmeric powder.


Cook covered until the tomatoes are mushy. Now add the coconut powder, chilli powder, Garam masala powder and coriander powder. 


Give a thorough mix and add the cooked drumsticks along with the water.


Mix well. Check for seasoning and cook for another five minutes to allow the drumstick absorb the juices and spices. Serve hot with either rice 🍚 or roti.

side dishes with drumsticks


Ingredients


Drumstick  4
Onion  3
Tomatoes  2 ( big )
Oil  2 tbsp
Mustard seeds  1/2 tsp
Cumin seeds  1 tsp
Curry leaves  few sprigs
Red chillies  2
Hing  big pinch
Salt  to taste
Coconut powder  1 1/2 tsp
Chilli powder  1 tsp
Garam masala powder  1/2 tsp
Sugar  1/2 tsp


Method

  1. Wash and cut the drumstick in finger sized pieces. 
  2. Cook in sufficient water until soft and tender. 
  3. On cooking, drain the water and keep the drumstick aside. Retain the water as well for the preparation  of the curry. 
  4. Heat oil in another pan and temper it with mustard seed, cumin seeds, curry leaves, hing and red chillies. 
  5. Add finely chopped onions and slit green chillies and sauté until transparent. 
  6. Throw in the ginger garlic paste and cook until the raw flavour of ginger disappears. 
  7. When the onions turn light brown in colour, add chopped tomatoes, turmeric, salt and sugar. 
  8. Cook uncovered until the tomatoes are completely cooked. Stir in between. 
  9. Sprinkle coriander powder, chilli powder, coconut powder and garam masala powder
  10. Mix well and add the drumstick along with the water that was preserved earlier. 
  11. Mix in well and cook for another five minutes so that the drumstick absorbs all the juices and spices. 
  12. Serve hot with either rice or roti. 

Notes


  • You can also add veggies like potato, carrots, brinjal etc. in the above preparation along with the drumsticks. 
  • Adding dried coconut powder gives a unique aroma and taste to the dish so do not skip on that step. 
  • This is the basic version of the drumstick curry. Keep watching this space for more recipes on drumsticks and other veggies.
  • Some people like to add some garlic pods during tempering. 


Continue ...

kalakand recipe with paneer and condensed milk / Orange Kalakand burfi recipe /

0

Kalakand Recipe with Paneer and Condensed Milk / Holi Special Food / Kalakand Burfi Recipe with Oranges


Kalakand - Indian milk cake sweet - an amazing dessert 🍨 which is made during festival seasons. This sweet is loved by almost everyone as it is so rich and delicious 😋. I have already posted the basic recipe of kalakand burfi. 


milkmaid dishes

Today's post of kalakand has a twist in it. I have added some fresh orange 🍊 pulp which makes it more tasty with a unique and typical taste. When I googled for this recipe, I did not find any but I found mango kalakand. So I prepared this sweet on a similar basis using oranges as this is the season of oranges.

holi food items

Talking about the taste, as I said earlier, it is very yummy. Though it is a bit chewy, it is a mouth watering sweet. I have prepared this milk cake for the occasion of Holi. The previous post of kodbale which is a savory snack is also a special recipe for Holi.

kalakand burfi recipe with oranges

You can also check my other festive recipes like

Chena Poda

Pumpkin Halwa

Custard Apple Rabdi

Palkova Recipe

Sabudana Vada Recipe

Poha Kesari

Carrot Kheer

Boorelu

Coconut Jaggery Laddoo

Paneer Kheer    and   many more.....


Preparation


Heat milk in a pan. Allow it to come to a boil.


When it starts to boil, add curd. You can also add lemon juice or vinegar to curdle the m milk. But in the latter case, you need to wash the Chena under running water to get rid of the sour taste from the lemon or vinegar.


Keep stirring gently until the milk Is completely curdled separating the chenna and whey. Now switch off the flame and strain the whey. Strain in such a way that there is no moisture left in the paneer


Take the Chena ( without any moisture ) in the pan and put it on a low flame. Strain the chenna well without any moisture. My pic shows that there is water, but make sure that you are not left with any water to speeder the cooking process and to get a soft kalakand. 


Add the orange 🍊 pulp and mix well.


Add the condensed milk and keep stirring to avoid burning at the bottom.


Cook on a low flame until there is no moisture left.


Meanwhile keep a plate or a pan greased with ghee and set aside.


When the water is completely evaporated from the mixture and you are left with a mass, switch off the flame.


Transfer to the greased pan and even it with a knife. Sprinkle dry fruits of your choice and allow it to come to room temperature.


Keep it in the fridge for 2-4 hours or overnight and cut into desired shapes. Enjoy with friends and family.

milkmaid recipes


Ingredients


Milk  1 l

Orange  pulp 1/4 cup

Condensed milk  1/4 cup + 4 tbsp.

Curd  4 tbsp.

Ghee  2 tsp

Nuts  to garnish

Method

  1. Bring milk to a boil. 
  2. Add curd when it is boiling and allow the milk to curdle completely.
  3. Drain the whey from the chenna.
  4. Take the Chena in the pan and put on a low flame.
  5. Add condensed milk and orange pulp and mix well.
  6. Cook on a low flame until the moisture is completely evaporated.
  7. transfer to a greased pan and garnish with nuts of your choice.
  8. Allow to come to room temperature and refrigerate for 2-4 hours or overnight.
  9. Remove and cut into desired shapes.

Notes


  • If you do not have condensed milk, then cook milk until 1/4 th of its volume and then add Chena and orange pulp.
  • Do not cook Chena for long as it will become too hard if cooked for long.
  • Alternatively, you can first mix condensed milk and orange pulp. Cook until thickened and then add chenna. This way, the kalakand remains soft and tasty.
  •  It took a long time for me to get the water evaporated as I had not strained the chenna well. But you do not do the same mistake as mine. Do strain the paneer well and then add the remaining ingredients like orange pulp and condensed milk. 


Continue ...

Kodubale Recipe / Chegodilu with hyacinth beans / Karnataka Famous Food

0


Kodubale Recipe / Chegodilu with hyacinth beans / Karnataka Famous Food   


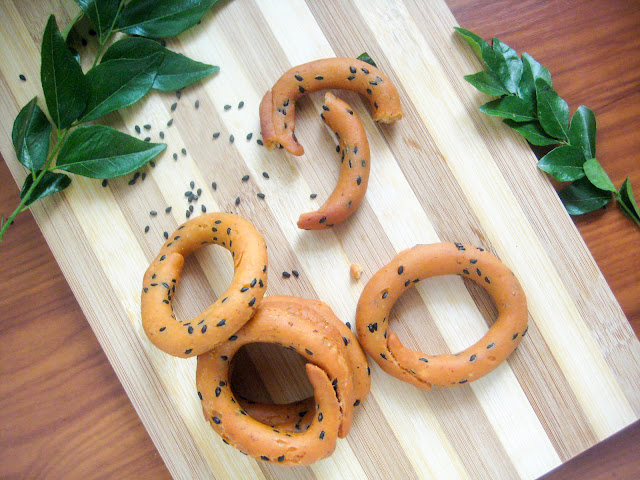
This is a snack recipe. When I first saw the recipe here, I was quite surprised and found it very interesting. I had some avarekai left in the fridge after preparing some Charu. So I thought of using it for the preparation of these chegodilu ( as we call them in Andhra ). They are crunchy, crispy snacks that fill our evenings. But today, I am preparing a softer version which are not so crispy. But they have an excellent texture which are chewy and very tasty. I have adapted the recipe to suit my family´s tastes. Do try out and let me know how it turned out for you. 

kodubale recipe with hyacinth beans

These field bean snacks are very easy to prepare and very tasty as well. However, they are not very healthy in the sense that they absorb too much oil when deep fried. So, I do not recommend these snacks on a daily basis, but are perfectly ok 👌 for festive occasions. Since Ugadi 2018 is another 20 days ahead of us, I planned to prepare this dish for the same.

chegodilu with hyacinth beans

The outcome of this snack is supposed to be crunchy and crispy but I made a soft version which was delicious as well. Serve this hot and your family 👪 would enjoy it thoroughly. However, you can also serve it cold, there is no compromise on taste.

karnataka special foods

You can also try out my other snacks like

Poha Oats Chivda 

Jowar Flour Murukku

Sago Vada

Soya Bean Sundal

Black Chickpeas Sundal

Aloo Matar Chat

Homemade Tapioca Chips

Masala Sweet Corn


Preparation


Cook the field bean seeds into soft in a pressure cooker until soft for upto 3-4 whistles. 


When they cool down, drain the water and mash them with a masher or hands.


You can also put them in a blender to get a smooth consistency. Do not throw away the water. We will require it to make a dough. Add salt, chilli powder, curry leaves, ajwain and hing. Mix everything well.


Now add the rice flour and maida flour and combine everything with your hands.


Heat homemade ghee until smoking point and add to rice flour mixture.


Carefully mix thoroughly with your fingers such that the ghee is nicely coated with the flour mixture. Now add the water ( that was kept aside earlier ) little by little to make a soft dough. It should neither be too watery nor too dry.


The consistency of the dough should be such that we should be able to form rings from the dough without breaking. If the dough Is too watery, then it will not hold the shape. Similarly if the dough is too dry, the dough will break when we try to form rings. Once the dough is ready, prepare the rings as shown in the video.


Sprinkle few sesame seeds on the platform. Take a small lemon sized ball from the dough and roll gently on the sesame seeds. Pressing gently, roll and form an even shaped cylinder. Join the edges and press gently such that they do not get apart. Prepare the rings until the dough is finished.


Heat oil in a pan for deep frying. The oil should not be too hot. If you drop a small piece of dough, it should come up immediately. At this point, drop the prepared rings in batches of 5 - 6.


Immediately, reduce the flame and cook on a low flame until they are cooked. They become light brown in colour and the bubbles also reduce. Remove from oil with the help of a slotted ladle and place on a tissue paper to absorb the excess oil. Repeat the frying process until completely done. Serve hot or at room temperature.

festival recipes

Ingredients


Avarekai. 1 cup

Rice flour  2 cups

Maida  1/4 cup

Salt. To taste

Chilli powder. 1 tsp

Curry leaves  2 -3 sprigs

Hing  a big pinch

Ajwain 1/2 tsp

Ghee 2 tbsp.

Sesame Seeds  2 tbsp.

Oil for deep frying

Method


  1. Cook avarekai in a pressure cooker until soft for 4-5 whistles.
  2. Drain the water and mash the avarekai very well. 
  3. Add rice flour, maida, salt, chilli powder, curry leaves, ajwain and hing. 
  4. Mix everything well and add hot ghee. 
  5. Carefully mix with your hands such that the ghee incorporates in the flour completely. 
  6. Now add water little by little and make a smooth dough just enough to make rings out of it. 
  7. Make rings with the dough as shown in the video. 
  8. Heat oil in pan for deep frying. 
  9. Fry these rings in a low to medium heat until they become golden brown in colour or until the bubbles stop. 
  10. Put them on a tissue paper to absorb the excess oil. 
  11. When they cool down, store them in an airtight container. They stay fresh for until 2-3 days.

Notes


  • These chegodilu are soft on the inner side and are chewy. An awesome evening snack. 
  • These can also be made crispy and crunchy by another method. I will share the same in another post. 
  • You can also use white sesame seeds instead of black sesame seeds.  
  • You can also add finely chopped coriander leaves, cumin seeds or ginger garlic paste as per your taste and preference.
  • You can also add butter or oil in place of ghee


Continue ...

Tasty Cabbage Recipes indian / Indian Vegetarian cabbage recipes / sauteed cabbage recipes /

0

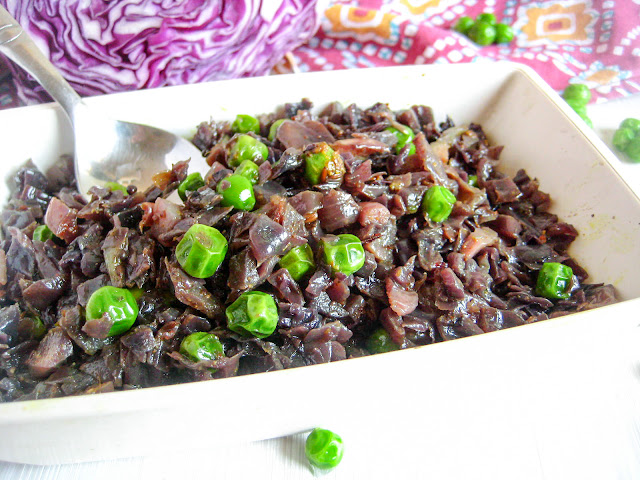
Purple Cabbage Stir Fry / Cabbage Curry Recipe Indian Style / How to Cook Cabbage Healthy


Purple cabbage fry is similar to that of the normal cabbage fry except the colour. The procedure of preparing this curry is also more or less same as the other fries like ivy gourd fry, ladies finger fry, cauliflower green peas fry, broad beans fry, simple radish fry, spring onion fry, karela fry, baby potatoes fry, etc. .

purple cabbage stir fry recipe

The nutrients in this purple coloured cabbage is way more than that of the ordinary one. As a matter of fact, the coloured veggies like carrots, bell peppers etc. are more necessary for our health. Health experts also advice us to take more coloured and colourful food which pleases our eyes
👀 and body. So, I do not miss any chance to grab these colourful cuties whenever I see them.

tasty cabbage recipes indian

If you check my broccoli stir fry recipe, I included sweet corn and capsicum. My idea was to make it colourful and tasty
😋. I could have included paneer, red bell pepper for the extra colour, but alas, I did not have any of them on me. I will work on this and let you know the outcome.
For today, its the simple cabbage fry which becomes more appealing with the addition of green peas. I have used the frozen green peas but you can also use the dried peas or fresh peas when available in the market. If you are using the dried peas, then soak them overnight and cook them in the pressure cooker the next morning. Now they are ready to be used in the preparation of this curry. 


how to cook cabbage healthy


Preparation


Heat oil in a pan and add mustard and cumin seeds.


When they splutter, put the chopped onions and slit green chillies in.


Sauté for a minute and add turmeric powder.


Give a stir and add the shredded cabbage. Sprinkle salt and sugar and mix well.


Cover with a lid and cook on low to medium flame. Keep stirring occasionally to avoid burning at the bottom of the pan. When the cabbage becomes soft and tender, remove the lid off and add the frozen green peas.


Mix well and do the seasoning with chilli powder, Garam masala powder, coriander powder and flax seed powder.


Mix well and fry for another 2 minutes. Switch off the flame and serve with either rice 🍚 or roti.

cabbage recipes indian

Ingredients


Purple Cabbage  1/2 of a medium sized cabbage
Oil  1 1/2 tbsp
Mustard seeds  1/2 tsp
Cumin seeds  1 tsp
Onion  1
Turmeric  1/2 tsp
Green peas ( frozen ) fistful
Salt  to taste
Sugar  1/2 tsp
Chilli powder  1/2 tsp
Garam masala powder  1/2 tsp
Coriander powder  2 tsp

Flax seed powder 1 tsp


Method

  1. Shred or chop the cabbage finely and keep aside.
  2. Heat oil in a pan and temper it with cumin and mustard seeds.
  3. When they crackle, add the chopped onions and green chillies. 
  4. Saute for a minute and throw in the turmeric powder. 
  5. Add the shredded purple cabbage along with sugar and salt. Mix well and cover with a lid. 
  6. Keep stirring in between to avoid sticking at the bottom of the pan. 
  7. When the cabbage becomes soft and tender, add the frozen green peas and cook for another 5 minutes. 
  8. Sprinkle all the spices namely, chilli powder, garam masala powder, coriander powder and flax seed powder. 
  9. Check for salt and switch off the flame. Serve hot with either rice or roti. This curry can also be used as a stuffing for katti roll or parantha. 

Notes


  • During tempering, you are free to add any ingredients like red chillies, channa dal, curry leaves etc. which give additional aroma to the dish. 
  • You can also include cumin powder in the spices list. 
  •  If you are adding fresh green peas, then add them along with the shredded cabbage and cook covered. 
  • If you want to use the dried green peas, then soak them overnight, pressure cook them the next morning and then use in the curry as mentioned above. 
  • To make it masaledaar, you can add ginger garlic paste as well.
  • You can also add any other veggies like carrots, potatoes, beans and paneer as well. 


Continue ...